Showing posts with label Scrappin Patch. Show all posts

Rebecca : Scrappin Patch Pink Paislee

>> Wednesday, October 24, 2012

Hello again! I am back with some more inspiration for you in this chilly October! Here in Canada we have just celebrated our thanksgiving and Autumn over. Winter is right around the corner! I cannot help but envy those of you in New Zealand, I understand the weather is getting colder for you, but warmer! I might just have to swing by there one of these winters to escape the snow and ice, and of course I would have to visit my favourite scrap booking store while I was at it! There are so many goodies there, I am not sure where I would start filling my basket, so its a good thing Adrienne gets to choose, and look at the gorgeous product she sent me to work with!


The papers are from the Pink Paislee Nantucket line, such a versatile line and perfect for my little project. I paired it with some goodies from my stash, but mostly embellishments that were included in my DT kit.


Challenges
Hope this inspires you to create something beautiful! 

Rebecca 

Read more...

{Rebecca} The Good Old Days

>> Monday, October 1, 2012

Its the beginning of a new month and that means it time for a new challenge at Scrappin Patch. With the arrival of my little girl, I took quite a few weeks off from my regular duties on my DT commitments, but I'm right back into the swing of things with this fun sketch!


I took a few liberties (as always!) and created a fun layout using photos from a family trip we took last year.


Read more...

{Rebecca} Love is always in Season

>> Wednesday, August 1, 2012

How gorgeous is this sketch from Once Upon a Sketch? I've been looking around for layout challenges for a while that could help get the mojo flowing and I have to say that I think I found what I'm looking for. The site is gorgeous and all the wonderful inspiration from the design team is almost overwhelming! Thanks ladies for the kick start!

I also used this inspiration board from Berry71Bleu for some added inspiration. There's a few little butterflies scattered throughout the page. Somehow I am finding it very difficult to leave them off any project that I do!


I started with some pretty pastel colours and just allowed the page to grow from there. I love how I ended up having all the right shades of turqoise, even though I didn't think I had any in my stash! The new American Crafts Knock Out punches have been getting a work out over here, but they're just so much fun!

SUPPLIES
Prima Paper, flower, ribbon
Vintage Buttons, ribbon, dictionary paper
American Crafts Knock Out Punch
Martha Stewart Butterfly Punch
Crate Paper Chipboard

Challenges

Read more...

{Rebecca} Scrappin Patch : OTP inspiration

>> Monday, July 16, 2012

This is my last post for a few weeks as I'm taking a a little bit of a break for a rather important event in our lives :) Our little one is due in about 3 weeks, and with having just moved house we decided a few weeks off from my scrapbooking room (the husband has literally locked the door so I'm not tempted ... ) so I could concentrate on the next few weeks. Needless to say we are extremely excited to meet our little one!

For my this post I have two projects I wanted to share, both using up the bits and pieces that I've collected from the gorgeous kits that I have been sent. My first project is a dolled up jar full of preserves. I love the idea of giving home made food gifts and love finding fun ways to dress it up. These papers from Prima were the touch I needed.

 and to go with it .... a card made from the this and that. Do you ever have paper that you can't remember who its made by? After my initial projects made from this kit, these pieces found their way into my scrap stash and I completely lost track of what they were. I do know though, that you can find the exact papers in the Scrappin Patch store. Maybe you should head on over there and do a little detective work. I'd love it if someone came back with some information :)

Thank you so much for being part of my adventure. 

Read more...

Scrappin Patch : (Prima) You've been Promoted!

>> Saturday, June 23, 2012

Another project for Scrappin Patch to share with you today!

For this father's day, my husband informed me rather suddenly that he had every intention of celebrating it. I of course was more than happy to comply as I love any excuse to celebrate! Our little one is not due until August, but just because it is a little shy doesn't mean that we cannot enjoy being parents already ... I had a little trouble knowing what to put on the card, but once I got past that, this card just came together and my husband loved it.

SUPPLIES
Prima : Paper and cardstock
Vintage buttons
Cosmo Cricket : Type font

More great Prima product to work with, though I choose a much simpler card this time. That seems to be a trend in this household. The cards I make for girls tend to get very "product heavy", while my masculine cards are much more CAS. How do you do it?

Thanks for looking! 

Read more...

Scrappin Patch : Origami Dress Tutorial

>> Thursday, June 14, 2012

 
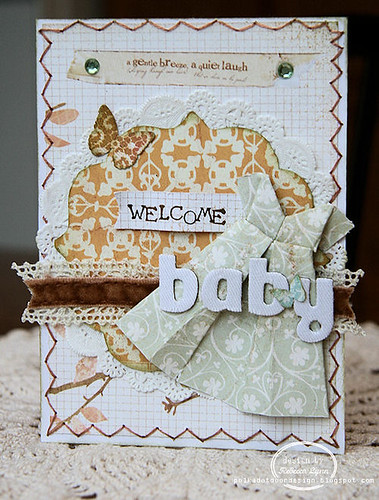
A few months ago I saw an adorable little card with a handmade dress embellishment and decided then and there, I was going to master the skill. It took a little bit of searching since I had never attempted origami before and had no idea where to begin, but I finally found a a youtube tutorial that helped me through the process and help me create something that has become one of my favourite little tricks that I've picked up. I've attached the youtube link to this post as well, just in case my photo tutorial and instructions are a little hard to follow. It took me a few tries to get it just right.

My most recent Scrappin Patch kit came full of yummy Prima Songbird papers and they were just the right texture and pattern for this little dress. You don't want to use a really heavy paper because it doesn't fold easily, but you also don't want to use a lightweight paper as it will tear! Some medium is perfect.


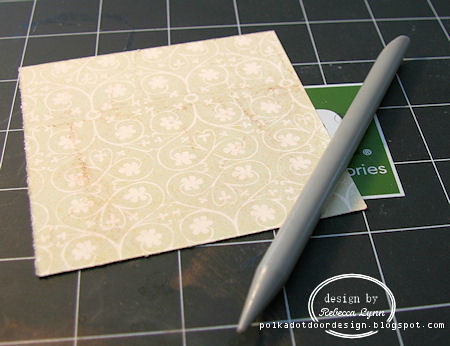
The only tool you (may) need is something to press the folds and help get them nice and sharp. But fingers work well too! You want a square piece of paper approx. 1/2 inch larger than the finished size you want to end up with. In this case, I am using a 3.5 x 3.5 inch square.


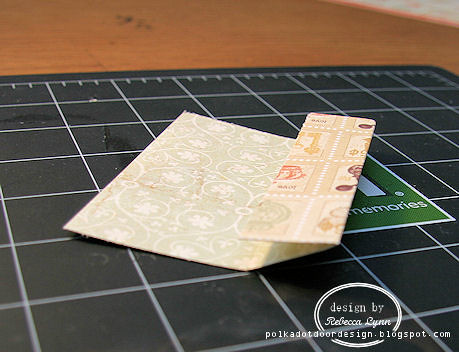
Fold your paper in half. Crease this line well.


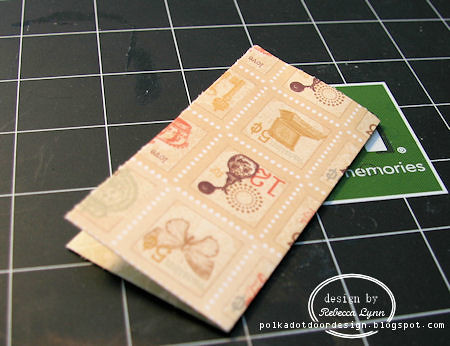
Then unfold your paper, and fold the edge to the center crease.Repeat with the opposite side.


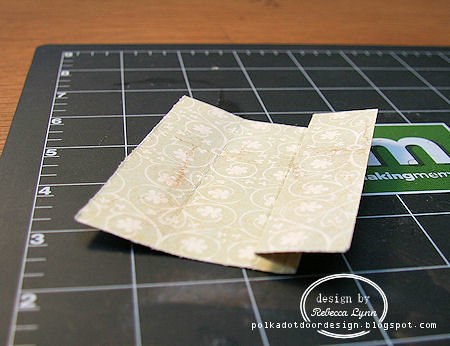
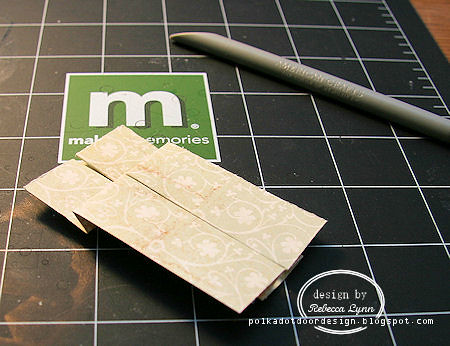
Unfold your paper again and fold half of your halves, in half again. Its a bit complicated to explain, but hopefully you can see what I mean in the photo. Repeat. The end result is that you want it to look like this :


Be sure to crease these folds well. This is the basis of your dress form and the sharper the lines are, the better.


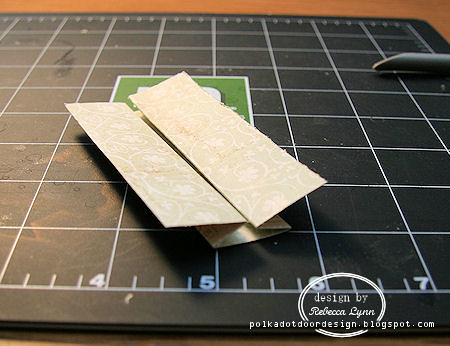
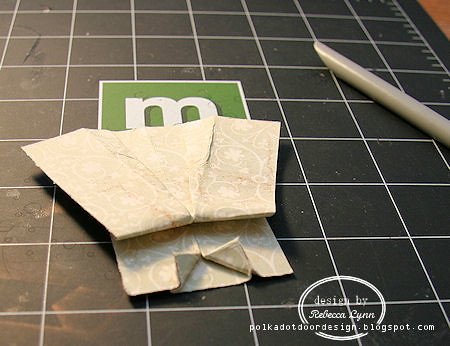
Now turn your paper over and fold it at about the 1/3 line. This fold is very customisable, as it creates the separation between the skirt and the bodice of the dress. Depending on the style of dress you want to create, you may want to change the length of this fold. 


Fold it once over itself so that your paper now looks like this. 


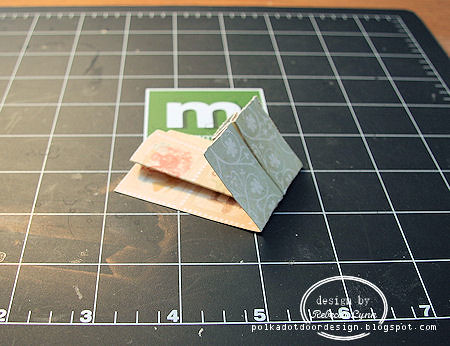
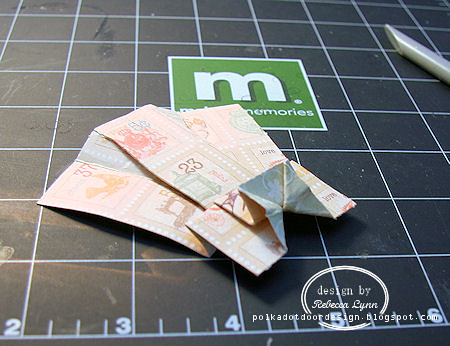
To create the full dress, you want to gently pull one section of the skirt so that you are opening up the part from the bottom up. The waistline will no longer be straight across, but a slight "v" once both sides of the skirt are pulled open. Crease these lines sharply. 


We're now creating the neckline. Bring the corners of the topmost layer of the paper and fold inwards.


This is probably the trickiest part of the dress... Unfold your neckline, turn the dress over and pull the corners inside, pulling down the excess paper as you go so that there is a full "v".


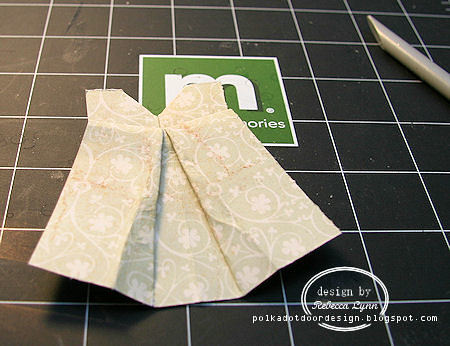
This is how the front should look.


Again on the backside of the bodice, fold the sides of the bodice in, you may have to crease the skirt a bit to help everything line up as well. Then take the corners of your turned in sides and fold them out again, creating the sleeves.


and thats it, you're done! Hope you were able to understand my instructions! The youtube video is an excellant resource if you get stuck.


I just love how easy this dress is once you get the hang of it. You may need to practice on scrap paper before you attempt working with your nice paper, but its such a fun little dress, and perfect for so many applications. Now that I know how, I have to tell myself not every card needs a dress. Little boys really are more into trucks and puppy dogs ....

Thanks for stopping in!

Read more...

Scrappin Patch : Welcome Baby!

>> Monday, June 4, 2012


Knowing that I also had a technique post coming up shortly (June 14th!) I decide to make a card for Scrappin Patch using a technique that I am planning to highlight in my next post, adorable Origami dresses!! These are so much fun to make, and the Prima Songbird paper line was the absolute perfect match for the ideas that I had in my head.


SUPPLIES
Prima : Paper and embellishments
American Crafts : Thickers
Recollections :  Alpha stamps

I handstiched the paper to the card and accented the background with a few rhinestones. I then added the doillie and more Prima paper before accenting it with the ribbon, text, butterflies, and dress. I had so much fun working with the Prima product and there was more I wanted to add, but some of it will have to wait until my next post. They have some fabulous product that you'll have to visit the Scrappin Patch store to look up.

Challenges :


Thanks for looking!

Read more...

STARS in thier Eyes Competition

>> Wednesday, May 30, 2012

Have you been to the Scrappin Patch blog recently? If you haven't, you'd better hop on over and see whats up! The girls are hosting a challenge unlike anything you've seen before with prizes worth over $300 to be won!! For the next 5 weeks scrap something in the style of the current STAR (this week its the amazing Cheryl Gorka from She Stamps) and you're eligible  for the grand prize and/or random give aways during the week.

Here's my take on Cheryl's style. Hop on over to the Scrappin Patch blog for more details!

SUPPLIESMy Minds Eye Paper, Buttons, Ribbon
Meljen's Design Donkey Stamp
Bazzil Cardstock

Challenges

Read more...

May arts Design Team Call : Round 1

>> Saturday, May 12, 2012


I decided I would go ahead and give this a shot, even though I know there are some wonderfully talented ladies who are applying for the same position. May Arts is such a neat company with some gorgeous ribbon that I couldn't resist the opportunity to at least promote the call and the company! May Arts asked for projects that highlighted the use of ribbons and while I'm not fortunate enough to have their ribbons in my collection (there is an order about to be placed though!) I have hoards and hoards of vintage ribbon that I keep picking up from thrift shops that almost always finds its way onto my projects. So I thought I would share.'

Project {One}
I made this card specifically for the call using up bits and pieces from what was left over from my Prima kit. I love how vintage this card feels, and the ribbon that was included was absolutely gorgeous and so much fun to work with! Its not a complicated card, and came together rather simply. Just a few layers of paper (cardstock then the patterned paper), added the doillie and ribbon, and crafted the centerpiece from a 1960's songbook, and finished it off with a Recollections journelling tag and butterfly. Perfect card for any occasion!

Challenges:


Project {Two}
This card I actually made for our bloghop a few weeks back, but had posted it to my personal blog so its new to the Polkadot Door! I had so much fun with this card! There were so many fun textures and techniques that went into it, and it was such a fun twist on the typical sunbeam card to use these colours and a vintage spin. There is lots of ribbon and fibers here, all of which once again, are antique finds from the local thrift shops. I thought that creating a sunbeam card couldn't be all that hard, but have only had marginal success in the past, once I discovered this template from Melz Stamps, it was so much easier!

Project {Three}
I love using ribbon on my projects, whether cards, layouts, or some of the altered items I've made. Its just such a perfect product to add that special "pop". Finding a third project with ribbon wasn't a problem, but I wanted to find just the right one, so I dug around in the archives a little and came back with one. This is an older project that I made a few years back. But it uses a fair amount of ribbon so I thought it was a good candidate :) I used four different ribbons, the first two should be easy to spot, the other two I twisted up and turned into "roses" on the bottom right hand corner of the circle. Its such a bright card and so girly! It seems when I'm in the ribbon mood, I tend to make girl cards!

Thank you so much May Arts for this opportunity!  To everyone else who is interested in the call details, it can be found here, on the May Arts Blog until the 15th of June!

Read more...

Scrappin Patch : Prima Baby Banner

>> Thursday, May 10, 2012

I have to say, this is probably one of my favourite projects to date. I haven't quite decided yet if its because anything associated with my little one is a happy thought, or I was sent a box full of gorgeous Prima product to work with and I love how this turned out.


With the exception of the chipboard letters and doillies, everything here is from the Prima Songbird collection. I love how well it coordinates and just how easy it was to work with the product.


Challenges: 


Hope this inspires you to create something crafty of your own!

Read more...

Happy Birthday to the Polkadot Door!

>> Tuesday, May 1, 2012

Its our Blog-iversary!

We're so excited to be celebrating 2 years on the web, and in the spirit of celebration, we are having a bloghop where you'll find lots of prizes and inspiration along the way. Hurrah! 

 
A bloghop on the Polkadot Door wouldn't be complete without an inspiration challenge. We asked each one of some of our favourite friends throughout the world to create a project based on the above inspiration challenge.

Here's what Sarah created this adorable page using the Inspiration as a starting place.


• Plus, there's a chance to play along with us! Use the inspiration we gathered, link your entry back here on this blog post, and you could win a shop credit to Scrappin Patch.
• You have until May 10th to complete the hop and link up your sketch challenge entry below to be eligible for the hop prize!
• But that's not all! If you leave a comment on this post and become a follower of this blog you are eligible to win a this fantastic blog candy from us, The Polkadot Door! There is vintage song sheet paper, dictionary sheets, chipboard, buttons, ribbon, cardstock, patterned paper and a few surprises too!


Hop along with the lovely ladies below and have even more chances to win prizes as well as be inspired to use the inspiration before May 10th.
Lisa
Rebecca
Cheryl
Geri
Megan
Scrappin Patch 
The Polkadot Door (You are Here) 
Thank you so much for hopping along with us for our 2nd blogiversary! I am thrilled to be in the company of these talented ladies and hope you'll find the hop fun and inspirational, as well as motivate you to play along with the inspiration.
 
Can't wait to see what you all make using the inspiration!

Read more...

Scrappin Patch : OTP Inspiration

>> Saturday, April 21, 2012

I have two cards to share with you today for my Scrappin Patch Inspiration post. I thought I had run out of time and could only make one, but somehow the second card manage to squeeze itself into the time I had set aside. I love it when that happens! I was even more productive than I had planned ;)

I'm still playing with these gorgeous stickers and papers from my last kit. I can't believe how far you can stretch a kit when you need too. Originally I looked at all the things Adrienne and sent and thought "theres no way I can get 7 projects from this!" but I managed 8, and still have some left overs. Hurrah!

I used the technique from this post I created a matching flower with my little scrap bits and adhered it to a card that pretty well used up the rest of my larger scrap bits :) I love making cards for that reason, there always seems to be enough paper even when its just little bits and pieces. Once again I was able to use the gorgeous Glitz Vintage Blue "Titles" stickers for the sentiment/banner.


For my next card, I dug into my own stash a little more to accent the great Scrappin Patch product. I had a a really hard time photographing this card, no matter what angle/lighting/setting I was using, the layers just aren't coming through like they do in person. I think it might be because I was a bit generous with the glimmer mist once I had adhered it all together! I loved these roses from Glitz's Vintage Blue line, they worked as the perfect backdrop for the rest of the card. Its hard to see, but I created an origami dress behind the "MOM", a technique I just recently discovered but will be sharing with you all in my next technique post. They are so much fun, and so cute!


 I'm off to enjoy the gorgeous spring weather, and hope its just as beautiful where you are! Thanks for stopping in.

Read more...

OPT Inspiration : Welcome Baby!

>> Saturday, March 31, 2012


This is my final March post for the Scrappin Patch blog. After this I will be taking a few weeks off while I wait for my next DT kit to arrive. I'm so excited to see all the goodies from the store that will be on thier way. I have loved all the product I've been privilaged to work with. Its fun having someone else put together and kit for you because often there are products you wouldn't pick out yourself, but once they arrive, it can be very inspiring!


This fun little project is a baby card for my sister-in-laws little boy. The papers I had were very grown up, but I decided to use them here anyways. Paired with the giraffe I think its just right.

Till next time,


Read more...

OTP Inspiration : Happy 49th!

>> Sunday, March 25, 2012


Birthday cards are always fun to make and one of the greatest reasons that I started making cards in the first place because it enabled me to create something that was geared specifically for that person. What better way to let someone know they are special, than with a one of a kind birthday card created just for them? The birthday in this case is my special Dad who turns 49 this year. Being recently married, this will be the first one of his birthdays that I won't be around for (for the past 25 years anyways ... ) It was a little odd writing this card and sending it in the mail already, but not being there for birthdays is certainly a new experience that I am going to have to get used too.


Most of the materials for this card came out of my DT kit from Scrappin Patch. I am thoroughly enjoying this kit that Adrienne sent from New Zealand for me. So many fun patterns and textures to be working with. Again, I used the Glitz stickers to embellish various portions of the card and admit I raided my (huge) stash of alphas for the various fonts used. I noticed when I made this card that my Chatterbox Alpha rub ons are running out! I have used them so much I'm almost all used up. I've browsed around the Scrappin Patch online store though and have some replacements picked out! There are so many fun goodies in the store, have you looked recently? The girls are always updating with new stock.

I wish I knew exactly what the supplies I was using were, but the supply list never made it into my kit, so if you know what the papers are, be sure to let me know and I'll update the supply list. The April newsletter is almost ready to be released as well, if you haven't already signed up for it, you really need to get on the list. The DT girls have been given a bit of a sneak and its not an issue you want to miss. There is all sorts of great inspiration coming to an inbox near you!

Until next time, 


Read more...